apisix没有rewrite阶段,rewrite和access阶段都在access中执行,也即虽然可以写rewrite的插件,但是会在access阶段执行,并且rewrite的插件会比access插件以更高优先级执行
https://cloudnative.to/blog/apisix-source-code-reading/#1-apisix-%E6%A6%82%E8%BF%B0


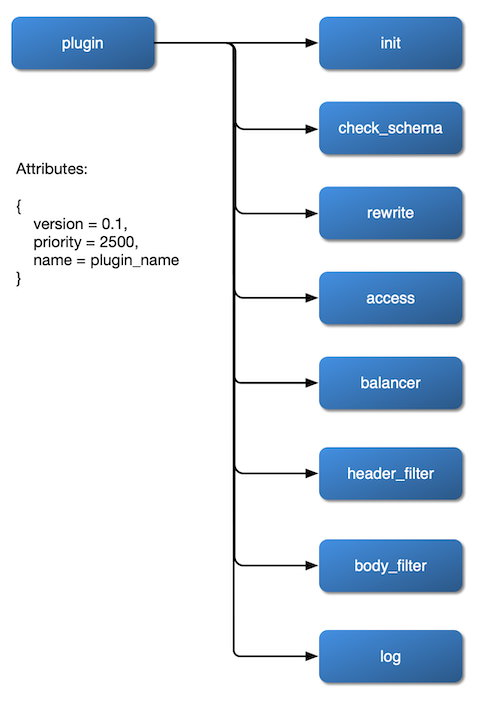
api路由是即时生效的,但是插件的更新、修改、新增需要手动reload,dashboard要重启
一些插件的介绍(服务发现、负载均衡等)
https://www.modb.pro/db/152237
编写插件需要最终制定插件的执行阶段,rewrite、access还是其他的。
而这些阶段都有两个传参:conf和ctx
https://apisix.apache.org/zh/docs/apisix/plugin-develop#%E7%BC%96%E5%86%99%E6%89%A7%E8%A1%8C%E9%80%BB%E8%BE%91
conf 参数是插件的相关配置信息(当前插件的配置数据),ctx 参数缓存了请求相关的数据信息(包含所有插件、route设置等的信息)。

官方的插件例子:
https://github.com/apache/apisix/blob/35269581e21473e1a27b11cceca6f773cad0192a/apisix/plugins/limit-count.lua#L177
官方使用方法介绍
https://apisix.apache.org/zh/docs/apisix/2.8/architecture-design/#service
使用admin api创建route、service、upstream等对象,并且介绍了核心常用概念
route就是路由设置,是最原子的一个api路由配置
service是upstream和插件的组合,为了避免重复设置相同的upstream和插件,可以创建一个service对象,然后route设置时引用
注意:当service和route都使用了同样的插件时,route的插件设置优先级更高,所以此时使用route中的插件设置
consumer是api消费方的抽象,我们有时候需要知道到底有谁使用了这个api,并且为不同的消费方制定不同的插件,consumer必须有鉴权,通过某个key鉴权通过后,apisix才会拿到consumer_name,进而查询etcd,拉取该消费方的配置信息,来完成整个http请求周期。
注意:consumer中也有插件设置,在apisix中,插件设置的优先级为consumer>route>service,使用相同的插件时,前者会覆盖后者。
script是http请求生命中求中执行的脚本,与plugin互斥,有script则会优先执行script,而不执行plugin,script是lua代码,我们也可以在script中执行一些插件的调用。
radixtree是一个匹配搜索引擎,主要用来匹配route中设置的uri,来确定使用的是哪个route的信息。
global rule是全局的插件设置,一旦创建某个global rule以后,就会对所有的route生效,所有的route都会使用这个插件设置。
plugin config是一组插件的配置,将重复使用到的插件组合抽象成一个plugin config对象,在设置route时进行引用,如果引用了一个没有设置的plugin config,则该路由报503错误,如果route也设置了插件,则会与plugin config的插件合并,都会在http请求周期内被调用,而如果route自身设置了与plugin config相同的插件,则优先使用plugin config中的配置(也即覆盖route中的设置)。
官方博客
https://apisix.apache.org/zh/blog/2020/12/11/beike-how-to-build-gateway-based-on-apache-apisix
官方插件开发文档
https://apisix.apache.org/zh/docs/apisix/plugin-develop#%E7%BC%96%E5%86%99%E6%89%A7%E8%A1%8C%E9%80%BB%E8%BE%91
新插件的优先级( priority 属性 )不能与现有插件的优先级相同,您可以使用 control API 的
/v1/schema 方法查看所有插件的优先级。另外,同一个阶段里面,优先级( priority )值大的插件,会优先执行,比如
example-plugin 的优先级是 0 ,
ip-restriction 的优先级是 3000 ,所以在每个阶段,会先执行
ip-restriction 插件,再去执行
example-plugin 插件。

为了实现路由动态配置,Apache APISIX 做了两件事:
-
在 Nginx 配置文件里面配置单个 server,这个 server 里面只有一个 location。我们把这个 location 作为主入口,这样所有的请求都会走到这个地方上来。
-
我们用 Lua 完成路由分发的工作。Apache APISIX 的路由分发模块,支持在运行时增减路由,这样就能动态配置路由了。
openresty的执行阶段概念
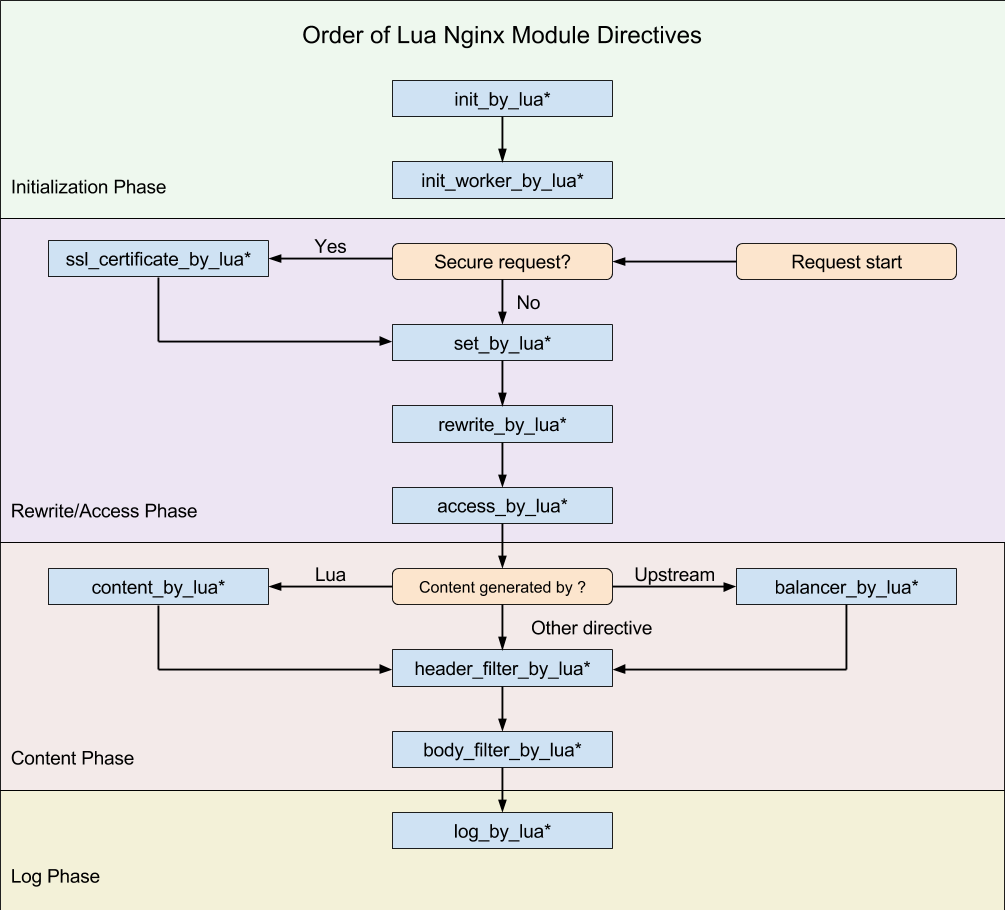

apisix和openresty的执行阶段较为相似,但存在一定的不同,例如apisix没有rewrite阶段,rewrite的相关操作都在access中一并执行,只是优先级更高。
apisix官方文档 md
https://www.bookstack.cn/read/apisix-2.8-zh/architecture-design-apisix.md
apisix discovery相关
在apisix/upstream.lua中调用了discovery的nodes函数,来使用服务发现获取下游节点:
该函数其中一个形参为api_ctx。

所有获取的nodes,会在apisix/balancer.lua中使用checker来检查健康度,过滤不健康的node,在apisix/balancer.lua中的pick_server函数来从nodes中选择最终访问的下游地址;可以理解成,discovery返回所有的地址,由apisix的负载均衡模块来具体选择某一个地址。
-- pick_server will be called:
-- 1. in the access phase so that we can set headers according to the picked server
-- 2. each time we need to retry upstream
pick_server函数会在access phase中被调用,以便设置一些headers。
server_picker就是我们route中设置的type指定的负载均衡类型,每个type都在apisix/balancer/xxx.lua中对应有代码:

server_picker在apisix中会做一个LRU缓存。
从服务发现返回的节点中,会做健康检查(apisix/balancer.lua的fetch_health_nodes函数),APISIX 的健康检查使用lua-resty-healthcheck实现,你可以在 upstream 中使用它。
注意:
-
只有在 upstream 被请求时才会开始健康检查。 如果一个 upstream 被配置但没有被请求,那么就不会有健康检查。(也即我们的upstream要提供一个可以探活的接口)
-
如果没有健康的节点,那么请求会继续发送给上游。
-
如果 upstream 中只有一个节点,就不会有健康检查。 因为该唯一节点无论是否健康,请求都会发送给上游,
-
主动健康检查是必须的,这样不健康的节点才会恢复。
健康检查分为主动和被动两类,主动是指请求指定的探活接口判断是否健康,而被动则是指根据请求upstream返回的状态码来判断(只是例子)。
https://www.bookstack.cn/read/apisix-2.8-zh/health-check.md
上面的链接解释了apisix的健康检查配置逻辑,以及每个配置项的意义。
lua-resty-healthcheck会对使用add_target添加的upstream进行get_target_status来判断健康与否,如果没有add就不会被判断,但目前看apisix的代码,都add了(apisix/upstream.lua):

看healthcheck的源码,即使我们的upstream配置没有给checks相关的设置项,都会被添加到健康检查的target_list中,然后在apisix/balancer.lua中调用get_target_status来获取健康状态,目前没有看到是在哪里主动探测健康度的(checks配置中可以设置主动检测的接口,目前不知道是哪里请求了)。
admin api使用文档
https://github.com/apache/apisix/blob/master/docs/en/latest/admin-api.md
https://apisix.apache.org/zh/docs/apisix/admin-api/ 中文版
ip-restriction插件
在插件中增加打印:

打印结果:

该route的插件设置为,(disable字段可以忽略,是dashboard自动加上的,false表示现在这个插件正在被使用):

所以可以看到,conf确实是插件的配置json内容,但ctx现在无法打印,报错说是一个函数无法被序列化。
使用core.log.warn(core.json.encode(conf))和core.log.warn(core.json.encode(ctx, true))能够打印conf和ctx。
local ngx = ngx
core.log.warn("in ip_restriction ngx.req.get_headers(): ",core.json.encode(ngx.req.get_headers(), true))
core.log.error("type of ngx.req.get_headers() is : ",type(ngx.req.get_headers()))
ngx.req中有请求的一些信息,如下所示,都是函数,可以用来获取请求信息,ngx是一个全局对象,应该是可以在任何一个插件中获取信息。
ngx.req的成员函数:
{
  "get_method": "function: 0x7f4482bd3680",
  "http_version": "function: 0x7f4482c160b8",
  "raw_header": "function: 0x7f4482c16120",
  "set_header": "function: 0x7f4482bd39f0",
  "set_uri": "function: 0x7f4482c161f0",
  "set_uri_args": "function: 0x7f4482c16250",
  "get_post_args": "function: 0x7f4482c162b8",
  "read_body": "function: 0x7f4482c16320",
  "discard_body": "function: 0x7f4482c16388",
  "get_body_data": "function: 0x7f4482c163f0",
  "get_body_file": "function: 0x7f4482c16458",
  "set_body_data": "function: 0x7f4482c164c0",
  "set_body_file": "function: 0x7f4482c16528",
  "start_time": "function: 0x7f4482bd2f98",
  "get_headers": "function: 0x7f4482bd1598",
  "append_body": "function: 0x7f4482c165f8",
  "finish_body": "function: 0x7f4482c16660",
  "socket": "function: 0x7f4482c166c8",
  "clear_header": "function: 0x7f4482be8d18",
  "is_internal": "function: 0x7f4482c16728",
  "get_uri_args": "function: 0x7f4482bd3540",
  "set_method": "function: 0x7f4482bd3798",
  "init_body": "function: 0x7f4482c16590"
}
获取请求体的数据代码snippet:
ngx.req.read_body()
local body_data = ngx.req.get_body_data()
core.log.error("body data is : ",body_data)
日志输出:
2022/02/10 15:46:11 [error] 52#52: *5498 [lua] init.lua:96: phase_func(): body data is : {"echo":"helloworld"}, client: 9.134.111.144, server: _, request: "POST /test_apisix HTTP/1.1", host: "9.134.111.144:9080"
也可以直接core.log.error("ngx is : ",core.json.encode(ngx, true))打印ngx所有的内容,主要是一些函数,日志打印没有完全显示,应该是apisix限制了日志输出的长度:

插件开发

插件的新增apisix是热加载的,只需要通过admin api来reload即可
curl http://127.0.0.1:9080/apisix/admin/plugins/reload -H 'X-API-KEY: edd1c9f034335f136f87ad84b625c8f1' -X PUT
X-API-KEY是conf/config.yaml中配置的admin的key:

(现在测试是要在容器内执行才行,在容器外执行会403)
如果想要在容器外访问admin api,需要设置allow_admin:

可以在allow_admin下添加一个新的元素,例如:
allow_admin:
  - 127.0.0.0/24
  - 9.11.22.33
这样,在容器外使用下列请求就可以正常使用admin api:
curl http://9.11.22.33:9080/apisix/admin/plugins/reload -H 'X-API-KEY: edd1c9f034335f136f87ad84b625c8f1' -X PUT
(遗留问题:ip-restriction插件,修改apisix/plugins/ip-restriction/init.lua代码,reload之后没有直接生效,有可能是因为init.lua的问题,并不是普通插件的代码加载,这种情况下还是要重启容器。。。)
插件代码文件需要放置在apisix/plugins/下面,或者在我们的apisix配置文件中添加外部lua脚本的加载路径,插件代码放在该路径下也可以。
简单的插件(print_conf_ctx.lua):
local ngx = ngx
local core = require("apisix.core")
local plugin_name = "print_conf_ctx"
local schema = {
    type = "object",
    properties = {
        labels = { type = "object" },
    },
    additionalProperties = false,
}
local _M = {
    version = 0.1,
    priority = 0,
    name = plugin_name,
    schema = schema,
}
function _M.check_schema(conf)
    return core.schema.check(schema,conf)
end
-- 打印请求内容
function _M.access(conf, ctx)
    ngx.req.read_body()
    local body_data = ngx.req.get_body_data()
    core.log.info("print_conf_ctx:\n conf is: ",core.json.encode(conf))
    core.log.info("print_conf_ctx:\n ctx is: ",core.json.encode(ctx,true))
end
return _M
插件开发完成后,我们还需要修改config.yaml配置文件,将插件添加到插件列表,不然插件不会加载。
# config.yaml
plugins:
...
- print_conf_ctx
注意:
1、虽然conf/config-default.yaml中列了一系列的插件,在新增插件时,需要将default里面的插件都复制到conf/config.yaml中,不然找不到别的插件,相当于conf/config.yaml与config-default.yaml的同名对象是覆盖而不是append的关系。
2、config.yaml中的插件名就是我们lua中指定的插件名,一定要对应上,不然是找不到的(保证代码中的name、文件名、config.yaml中的插件名都是相同的就OK):

(补充一下,上述的properties就是插件配置的字段,default表示有默认值)
新写的插件,如果想要在dashboard上可视化的配置,需要根据下面的步骤实现:
https://apisix.apache.org/zh/docs/dashboard/FAQ
需要打开apisix的control api,修改conf/config.yaml文件:
apisix:
  ...
  enable_control: true
  control:
    ip: "127.0.0.1"
    port: 9090
如果是docker启动的apisix,则需要进入容器后,curl 127.0.0.1:9090/v1/schema才能获取当前的配置信息,在容器外9090端口没有暴露,没有被监听。
1、curl 127.0.0.1:9090/v1/schema > schema.json
2、将该schema.json文件复制到apisix dashboard容器的conf目录下(替换)
3、重启dashboard
apisix插件可用的打印全局变量的snippet
local tablePrinted = {}
local global_info = ""
function printTableItem(k, v, level)
    for i = 1, level do
        global_info = global_info .. "    "
        --core.log.error("    ")
    end
   global_info = global_info .. tostring(k) .. " = " .. tostring(v) .. "\n"
   -- core.log.error(tostring(k), " = ", tostring(v), "\n")
    if type(v) == "table" then
        if not tablePrinted[v] then
            tablePrinted[v] = true
            for k, v in pairs(v) do
                printTableItem(k, v, level + 1)
            end
        end
    end
end
printTableItem("_G", _G, 0)
core.log.error("global_info is:\n",global_info)
使用服务发现获取upstream时,ctx中有discovery_args等相关信息

因此,我们可以在某一个插件中,通过ngx获取headers/body的参数,然后改写ctx的upstream的内容,ctx应该是一个全局变量,可以测试下是否如此,如果这样可以的话,comm_cgi的原有能力就可以迁移(甚至基于规则路由的灰度发布也可以重现)
下面是一个使用插件改写服务发现参数的例子,为了保证获取完实例后,能正确转发到具体服务的接口上,使用了proxy-rewrite插件,改写了转发的uri。
https://www.madp.xyz/post/34
curl http://127.0.0.1:9080/apisix/admin/routes/333 -H 'X-API-KEY: 2aczvx5cwsexsd4o3g692v07yy7uhcae' -X PUT -i -d '
{
    "uri": "/comm_cgi/*",
    "plugins":{
        "replace_polaris":{
            "namespace": "Development",
            "discorvery_type": "polaris",
            "service_name": "event_svr"
        },
        "proxy-rewrite":{
            "regex_uri": ["^/comm_cgi/*","/$1"]
        }
    },
    "upstream": {
        "type": "roundrobin",
        "discovery_type": "polaris",
        "service_name": "event_svr",
        "discovery_args": {
            "namespace": "Development"
        }
    },
    "status": 1,
    "desc": "测试自定义北极星路由参数"
}'
https://github.com/apache/apisix/blob/master/docs/zh/latest/admin-api.md
各个admin api的请求body参数说明
问题:
1、重启容器和./bin/apisix reload都可以实现插件的生效,但是admin api的reload是失败的。(2022.0225测试发现还是得可执行文件操作才生效)

按道理确实是两种方法都可以,但api的目前不行。。
调试发现内置的插件ldap-auth有问题,导致api reload失败,在config.yaml去掉后,api正常可用


2、access.log日志输出的upstream_host居然是容器所在的ip
access_log的输出格式:

其中,最后一项输出$upstream_host/upstream_uri为容器的ip/uri,结合下面route设置的参数,默认情况下,pass_host为pass,所以作为服务,收到apisix的请求头中的host就是容器的ip,也即导致acces_log打印了这个内容。

apisix使用etcd做缓存
有时候网关层需要缓存一些用户的数据,例如用户的ticket,ticket是用来鉴权的,但是ticket有过期时间,如果每次网关层鉴权都真实请求到鉴权服务器,一方面是会降低网关层的转发性能,另一方面是会导致下游鉴权服务压力过大。
因此,如果要在apisix做一层鉴权,那么要自己做一层缓存,而apisix与etcd是耦合的,可以直接使用etcd作为缓存组件。
下面是读写缓存的snippet:
local core = require("resty.core")
local function has_cache(ticket)
    local ticket_info, err = core.etcd.get(ticket)
    if not ticket_info or ticket_info.status ~= 200 then
        core.log.error("miss cache: ticket",ticket)
        return false
    end
    local prev_expire_time = core.json.decode(ticket_info.body.node.value).Data.ExpireTimestamp
    -- 缓存还有5s过期 重新进行
    if prev_expire_time - ngx.time() < 5 then
        return false
    end
    core.log.error("OA-auth: request OA-ticket hit valid cache")
    return true
end
local function set_cache(tof_resp)
    local expire_time = get_timestamp(tof_resp.Data.Expiration)
    tof_resp.Data.ExpireTimestamp = expire_time
    local now_time = ngx.time()
    if now_time < expire_time then
        core.etcd.set(ticket, core.json.encode(tof_resp), expire_time - now_time)
    end
end
local function has_expire_cache(ticket)
    local exp_ticket_info, err = core.etcd.get(ticket .. "_expired")
    if not exp_ticket_info or exp_ticket_info.status ~= 200 then
        core.log.error("miss expired cache: ticket",ticket)
        return false
    end
    core.log.error("OA-auth: request OA-ticket hit expired cache")
    return true
end
local function set_expire_cache(ticket)
    core.etcd.set(ticket .. "_expired", "expired", 3600)
end
resty.core已经继承了etcd的模块,可以直接用来访问etcd,set、get缓存对象,set函数的参数为(key,value,ttl),ttl为缓存超时的时间,这个比较好理解。
但是对于core.etcd.get(key)操作来说,返回的对象就比较复杂,分为两种情况,一种是缓存命中,一种是缓存未命中。
get返回的对象类似于lua.http的response对象,调试过程中,打印结果如下:

我们可以通过status判断,这次请求etcd获取数据是否成功,成功的话是200,此时
local res,err = core.etcd.get(key)
res.body就是存在etcd中的数据结构,如下所示:
{
  "node": {
    "key": "your_key",
    "value": "your_value",
    "modifiedIndex": 161094,
    "createdIndex": 161094
  },
  "action": "get",
  "count": "1",
  "header": {
    "revision": "161095",
    "member_id": "10276657743932975437",
    "raft_term": "2",
    "cluster_id": "14841639068965178418"
  }
}
我们如果想要获取数据就使用res.body.node.value,不过我们用之前一定要判断这个是拿到缓存的情况,我们可以这么判断:
local res,err = core.etcd.get(key)
if not res or res.status ~= 200 or not res.body.node then
    -- get cache failed
else
    local val = res.body.node.value
end
apisix插件进行http请求
https://github.com/ledgetech/lua-resty-http
使用这个库就可以
snippet
local http_client = require("resty.http").new()
-- 然后参考github的demo就行 注意要判断http status
apisix灰度发布插件traffic-split
https://apisix.apache.org/zh/docs/apisix/plugins/traffic-split/#%E5%B1%9E%E6%80%A7
简单来说,就是在路由配置中启用这个插件,在这个插件中配置匹配规则,而匹配的变量是从请求中取出来的,可以使用nginx的一些内部变量名;例如下面的arg_name,表示从请求的参数重,取出name,如果name=json,那么就命中了这条匹配规则,使用这条规则下的upstream


上面这种是从请求的header中取参数
https://apisix.apache.org/zh/docs/apisix/plugins/traffic-split/#%E7%81%B0%E5%BA%A6%E5%8F%91%E5%B8%83
使用traffic-split做灰度发布,理论上和北极星的规则路由很像,只是用于灰度发布的参数是nginx直接帮你取出来了而已。
nginx的内部变量:
https://blog.csdn.net/m0_37556444/article/details/84563520
猜测,arg_name,cookie_name,http_name分别对应从uri参数、cookie、header中取参数
有没有办法接入apisix,不需要过多的测试验证工作呢
apisix做tcp/udp代理
简单来说,apisix可以监听额外的端口,在这些端口上,请求apisix的流量将会被代理转发给下游,就是一个proxy。
https://apisix.apache.org/zh/docs/apisix/stream-proxy
稍微详细一些的看官方教程,这里备注下简单的例子。
首先想要开启tcp/udp代理,需要在conf/config.yaml文件中,配置stream_proxy选项,默认情况下是没有开放tcp/udp代理的。
apisix:
  stream_proxy: # TCP/UDP proxy
    tcp: # TCP proxy address list
      - 9100
      - "127.0.0.1:9101"
    udp: # UDP proxy address list
      - 9200
      - "127.0.0.1:9211"

上面地址的含义为,当客户端请求127.0.0.1:9101,该tcp请求将会被转发,具体转发的下游服务,是在stream_route中配置的。
mysql是使用tcp连接的,我们可以在stream_route中配置客户端的地址,知道哪些客户端的请求才需要被转发,以及配置转发到哪里去。
curl http://127.0.0.1:9080/apisix/admin/stream_routes/1 -H 'X-API-KEY: edd1c9f034335f136f87ad84b625c8f1' -X PUT -d '
{
    "server_addr": "127.0.0.10",
    "server_port": 9101,
    "upstream": {
        "nodes": {
            "127.0.0.1:3306": 1
        },
        "type": "roundrobin"
    }
}'
例子中 APISIX 会把请求服务器地址为 127.0.0.10, 端口为 9101 代理到上游地址 127.0.0.1:3306。
这个例子是说,如果我们在本地部署了一个mysql,我们可以用下面的命令行直接连接mysql:
mysql --host=127.0.0.10 --port=9101 -u root -p
Enter password:
Welcome to the MySQL monitor.  Commands end with ; or \g.
Your MySQL connection id is 26
...
mysql>
tcp/udp代理还能处理TLS证书的代理,需要更复杂的配置,需要的时候搜索下看看文档。
apisix-grpc代理
https://apisix.apache.org/zh/docs/apisix/grpc-proxy
这个代理就和普通的route配置差不多,只是在upstream的配置中,要指定scheme字段为grpc/grpcs(有无TLS加密),以及route的uri格式为/service_name/method
curl http://127.0.0.1:9080/apisix/admin/routes/1 -H 'X-API-KEY: edd1c9f034335f136f87ad84b625c8f1' -X PUT -d '
{
    "methods": ["POST", "GET"],
    "uri": "/helloworld.Greeter/SayHello",
    "upstream": {
        "scheme": "grpc",
        "type": "roundrobin",
        "nodes": {
            "127.0.0.1:50051": 1
        }
    }
}'
这种代理的用途是指用户请求就是grpc的包,如果是前端发起过来的,一般是json,所以还需要grpc-json的协议转换。
要支持grpc,说明apisix支持proto文件的管理:
apisix external plugin
https://apisix.apache.org/zh/docs/apisix/external-plugin
这里的external plugin指的是用lua以外的语言开发的插件,需要通过中间件sidecar的方式被加载和运行,因而扩充了语言的写法,可以支持python、go、java、js

支持的 Plugin Runner#
-
Java:
-
https://github.com/apache/apisix-java-plugin-runner
-
Go:
-
https://github.com/apache/apisix-go-plugin-runner
-
Python:
-
https://github.com/apache/apisix-python-plugin-runner
-
JavaScript:
-
https://github.com/zenozeng/apisix-javascript-plugin-runner
apisix grpc-transcode
https://apisix.apache.org/zh/docs/apisix/plugins/grpc-transcode/
curl http://127.0.0.1:9080/apisix/admin/proto/1 -H 'X-API-KEY: edd1c9f034335f136f87ad84b625c8f1' -X PUT -d '
{
    "content" : "syntax = \"proto3\";
    package helloworld;
    service Greeter {
        rpc SayHello (HelloRequest) returns (HelloReply) {}
    }
    message HelloRequest {
        string name = 1;
    }
    message HelloReply {
        string message = 1;
    }"
}'
首先要在apisix中增加proto,使用admin/proto
然后在需要进行grpc-transcode的route中,选择grpc-transcode插件,并在插件的配置中选择proto_id,以及指定upstream为grpc
curl http://127.0.0.1:9080/apisix/admin/routes/111 -H 'X-API-KEY: edd1c9f034335f136f87ad84b625c8f1' -X PUT -d '
{
    "methods": ["GET"],
    "uri": "/grpctest",
    "plugins": {
        "grpc-transcode": {
         "proto_id": "1",
         "service": "helloworld.Greeter",
         "method": "SayHello"
        }
    },
    "upstream": {
        "scheme": "grpc",
        "type": "roundrobin",
        "nodes": {
            "127.0.0.1:50051": 1
        }
    }
}'
不过看官方文档,好像请求包都是在url中的,这个要确认下:
$ curl -i "http://127.0.0.1:9080/zeebe/WorkflowInstanceCreate?bpmnProcessId=order-process&version=1&variables=\{\"orderId\":\"7\",\"ordervalue\":99\}"
HTTP/1.1 200 OK
Date: Wed, 13 Nov 2019 03:38:27 GMT
Content-Type: application/json
Transfer-Encoding: chunked
Connection: keep-alive
grpc-encoding: identity
grpc-accept-encoding: gzip
Server: APISIX web server
Trailer: grpc-status
Trailer: grpc-message

{"workflowKey":"#2251799813685260","workflowInstanceKey":"#2251799813688013","bpmnProcessId":"order-process","version":1}
要找下例子,看看有没有放在json里面的,还是说这种情况需要grpc-json转换插件。
看了下官方的插件代码,其中有一个函数,是从http请求中取数据的,如下所示,可以从json body中取,也可以是url_param。
local function get_request_table()
    local method = ngx.req.get_method()
    local content_type = ngx.req.get_headers()["Content-Type"] or ""
    if string.find(content_type, "application/json", 1, true) and
        (method == "POST" or method == "PUT" or method == "PATCH")
    then
        local req_body, _ = core.request.get_body()
        if req_body then
            local data, _ = json.decode(req_body)
            if data then
                return data
            end
        end
    end

    if method == "POST" then
        return ngx.req.get_post_args()
    end

    return ngx.req.get_uri_args()
end
grpc-transcode和grpc-json-transcode插件的区别
两者都可以将http请求经过apisix代理转发给下游grpc服务,grpc-transcode是官方自带的,具体看上一节笔记的文档。
两者的主要差别在于,grpc-transcode需要在apisix这里维护proto文件,apisix会去编译,并且会将编译的结果放到lrucache缓存中,第一次请求有一定的编译成本,有缓存的时候则请求比较快。
apisix会基于proto文件,对请求中的数据(在lua中是一个table,这个table可以是json body,也可以是url_param),然后将数据core.json.encode之后,在二进制数据前加上grpc的一些头部信息,转发到下游。
proto文件在里面的作用就是一个校验的标准,没有定义在proto文件中的请求字段不会带到下游,apisix这里做了一层根据proto定义的请求过滤,apisix知道用户请求的是grpc,也知道是哪个grpc服务下的哪个接口,也即知道下面的内容,apisix完全知道这次grpc相关的服务信息:
service HelloWorld{
    rpc method_name(req_type) returns (resp_type);
}
反过来也有一层协议转换。
而grpc-json-transcode只是截取了grpc-transcode插件中的grpc-json协议互转的部分,只需要对数据进行协议转换,而不需要管理proto文件,只管这么转,请求字段是否合法由客户端保证,apisix只做编解码,而且不知道这次请求的是grpc的什么service的什么method,以及该接口的协议都不知道。
全部由下游服务自己来处理,处理出错就出错返回,逻辑非常简单。
grpc-transcode是严格按照protobuf来编码数据部分的,传输的时候就是proto的二进制;
而grpc-json-transcode是简单的将json数据encode之后,加上grpc需要的界定信息(是否压缩、数据长度,总计五个字节)传给下游,是否正常处理请求,需要下游服务知道从请求中按照json反序列化,由下游网络框架保证。
apisix插件control metdata
https://apisix.apache.org/zh/docs/apisix/control-api
上面是官方control API的介绍,如果插件有开启control api,则有插件自身的control api;
可以获取当前apisix使用的schema.json、upstream的健康度检查状态、发起apisix的gc等操作。
control API 可以被用来:
-
暴露 APISIX 内部状态信息
-
控制单个 APISIX 的数据平面的行为
https://gitcode.net/apache/apisix/-/blob/master/apisix/admin/plugin_metadata.lua?from_codechina=yes
curl http://127.0.0.1:9080/apisix/admin/plugin_metadata/trpc-transcode -H 'X-API-KEY: edd1c9f034335f136f87ad84b625c8f1' -X PUT -d '
{
    "response_package": {
        "code_name": "ret",
        "msg_name": "err",
        "data_name": "body",
        "enable": true
    }
}'
plugin_metdata这个admin api可以控制插件的一些配置,例如trpc-transcode插件可以设置回包的字段名,通过上面这个就可以设置指定字段名,看plugin_metada.lua的代码(apisix/admin/plugin_metadata.lua),是设置在etcd里的。
https://github.com/apache/apisix-dashboard/issues/2148(关于plugin_metadata的issue)

apisix 实现http到https
https://www.bookstack.cn/read/apisix-2.9-zh/d90bbe53ca9ebc33.md

apisix 支持https请求
https://www.bookstack.cn/read/apache-apisix-1.4-zh/6345c5ad2e3521d2.md
需要配置证书,以及证书允许的域名

apisix网关层支持https请求之后,用户chrome上发起的https请求就能正确响应,避免有很多服务还没有支持https的异常无法响应,继续往下访问下游服务就没问题了。
apisix使用etcd的原因
https://juejin.cn/post/7025898649758466062
apisix和openresty
目前了解到的,apisix其实就是一套lua库,openresty集成了nginx和lua解释器,本身openresty已经提供了大量的好用的lua库;
apisix会生成nginx.conf,openresty的nginx会用这个配置文件进行启动;
在这个nginx.conf中我们用到的apisix的uri都有对应的处理location、server;
使用了nginx中的xxx_by_lua_block的功能,将我们的lua代码可以在nginx中执行;
我们写的所有插件,通过配置config.yaml的刷新,可以被apisix搜索到,从而扩展网关的能力;
本质上就是nginx+etcd+xxx_by_lua_block的架构
启动的nginx worker数量默认和cpu核数相同

https://openresty.org/cn/components.html
上面的链接包含了openresty的所有组件,这些组件都是在apisix的lua代码中可以去引用使用的

openresty启动的时候-p 指定了工作目录(set prefix),在启动的时候指定为apisix所在的目录,然后就可以使用apisix的nginx.conf来启动nginx;
-p 是用来指定文件前缀的,在指定了文件前缀后,OpenResty 启动时则会基于该前缀去拼接对应的 Nginx 配置文件、日志文件地址等。
openresty的ngx_lua模块,使得我们可以直接编写lua代码,来实现高性能的web服务,nginx是c写的,因此有了openresty,我们不需要去改变核心代码,以模块、插件化的形式编写我们基于nginx的web服务;
而apisix也是基于openresty提供的这一套机制,有一套自己的core代码(都是lua),来实现apisix自己的特性;
因为apisix是基于openresty的,openresty自身也是支持我们编写lua代码,然后指定代码要执行的阶段的;只是apisix在重新加载nginx,生成nginx.conf文件上比openresty方便,因为我们会把新的插件写入到config.yaml中,apisix的命令行reload后会自动根据这个新的yaml生成nginx.conf(可以查看apisix/cli/ops.lua的代码),我们自己不需要去改nginx.conf(可能openresty需要这个步骤);
apisix基于openresty,搭配etcd作为配置中心,提供比openresty更方便的执行,性能上其实和openresty相差无几,因为网络逻辑层都是一样的;
// openresty的常用指令和参数
--[[
参考文档: https://www.nginx.com/resources/wiki/modules/lua/#nginx-api-for-lua
Nginx Lua模块指令:
    Nginx共11个处理阶段,而相应的处理阶段是可以做插入式处理,即可插拔式架构;
    另外指令可以在http、server、server if、location、location if几个范围进行配置:
指令: init_by_lua/init_by_lua_file
    处理阶段:
        loading-config
    使用范围:
        http
    解释:
        nginx Master进程加载配置时执行;
        通常用于初始化全局配置/预加载Lua模块
指令: init_worker_by_lua/init_worker_by_lua_file
    处理阶段:
        starting-worker
    使用范围:
        http
    解释:
        每个NginxWorker进程启动时调用的计时器,
        如果Master进程不允许则只会在init_by_lua之后调用;
        通常用于定时拉取配置/数据,或者后端服务的健康检查
指令: set_by_lua/set_by_lua_file
    处理阶段:
        rewrite
    使用范围:
        server,server if,location,location if
    解释:
        设置nginx变量,可以实现复杂的赋值逻辑;此处是阻塞的,Lua代码要做到非常快;
指令: rewrite_by_lua/rewrite_by_lua_file
    处理阶段:
        rewrite tail
    使用范围:
        http,server,location,location if
    解释:
        rewrite阶段处理,可以实现复杂的转发/重定向逻辑;
指令: access_by_lua/access_by_lua_file
    处理阶段:
        access tail
    使用范围:
        http,server,location,location if
    解释:
        请求访问阶段处理,用于访问控制
指令: content_by_lua/content_by_lua_file
    处理阶段:
        content
    使用范围:
        location,location if
    解释:
        内容处理器,接收请求处理并输出响应
指令: header_filter_by_lua/header_filter_by_lua_file
    处理阶段:
        output-header-filter
    使用范围:
        http,server,location,location if
    解释:
        设置header和cookie
指令:body_filter_by_lua/body_filter_by_lua_file
    处理阶段:
        output-body-filter
    使用范围:
        http,server,location,location if
    解释:
        对响应数据进行过滤,比如截断、替换。
指令:log_by_lua/log_by_lua_file
    处理阶段:
        log
    使用范围:
        http,server,location,location if
    解释:
        log阶段处理,比如记录访问量/统计平均响应时间
]]

ngx.var
-- nginx变量,如果要赋值如ngx.var.b = 2,此变量必须提前声明;
-- 另外对于nginx location中使用正则捕获的捕获组可以使用ngx.var[捕获组数字]获取;

ngx.var.request_uri
-- 这个变量等于包含一些客户端请求参数的原始URI,它无法修改,请查看$uri更改或重写URI。


ngx.var.scheme -- ngx.var.server_addr
-- HTTP方法(如http,https)。按需使用

ngx.var.server_addruri
-- 服务器地址,在完成一次系统调用后可以确定这个值,如果要绕开系统调用,则必须在listen中指定地址并且使用bind参数。

ngx.var.uri
-- 请求中的当前URI(不带请求参数,参数位于$args),可以不同于浏览器传递的$request_uri的值,它可以通过内部重定向,或者使用index指令进行修改。

ngx.var.server_name
-- 服务器名称

ngx.var.server_port
-- 请求到达服务器的端口号。

ngx.var.remote_addr
-- 获取远程的IP地址

ngx.var.remote_port
-- 获取远程的端口号

ngx.header
-- 输出响应头;

ngx.print
-- 输出响应内容体;

ngx.say
-- 通ngx.print,但是会最后输出一个换行符;

ngx.exit
-- 指定状态码退出。


ngx.redirect
-- 重定向;

ngx.status = 301
-- 设置响应的状态码;

ngx.resp.get_headers()
-- 获取设置的响应状态码;

ngx.send_headers()
-- 发送响应状态码, ,当调用ngx.say/ngx.print时自动发送响应状态码;

ngx.headers_sent = true
-- 判断是否发送了响应状态码。

ngx.req.get_headers
-- 获取请求头,默认只获取前100,如果想要获取所以可以调用ngx.req.get_headers(0);
-- 获取带中划线的请求头时请使用如headers.user_agent这种方式;
-- 如果一个请求头有多个值,则返回的是table;

ngx.req.get_uri_args
-- 获取url请求参数,其用法和get_headers类似;

ngx.req.get_post_args
-- 获取post请求内容体,其用法和get_headers类似,但是必须提前调用ngx.req.read_body()来读取body体
--(也可以选择在nginx配置文件使用lua_need_request_body on;开启读取body体,但是官方不推荐);

ngx.req.raw_header
-- 未解析的请求头字符串;

ngx.req.get_body_data
-- 为解析的请求body体内容字符串。

ngx.req.set_uri(uri, false)
-- 可以内部重写uri(可以带参数),等价于 rewrite ^ /lua_rewrite_3;
-- 通过配合if/else可以实现 rewrite ^ /lua_rewrite_3 break;
-- 这种功能;此处两者都是location内部url重写,不会重新发起新的

ngx.req.set_uri_args
-- 重写请求参数,可以是字符串(a=1&b=2)也可以是table;

ngx.escape_uri
ngx.unescape_uri
-- uri编码解码;

ngx.encode_args
ngx.decode_args
-- 参数编码解码;

ngx.encode_base64
ngx.decode_base64
-- BASE64编码解码;

ngx.re.match
-- nginx正则表达式匹配;

ngx.timer.at
-- 延时调用相应的回调方法;
-- ngx.timer.at(秒单位延时,回调函数,回调函数的参数列表);
-- 可以将延时设置为0即得到一个立即执行的任务,任务不会在当前请求中执行不会阻塞当前请求,而是在一个轻量级线程中执行。


-- 指令: init_by_lua
--[[
    nginx.conf配置文件中的http部分添加如下代码,
    #共享全局变量,在所有worker间共享
    lua_shared_dict shared_data 1m;
    init_by_lua_file /usr/example/lua/init.lua;
]]
--init.lua
--初始化耗时的模块
local redis = require 'resty.redis'
local cjson = require 'cjson'

--全局变量,不推荐
count = 1
--共享全局内存
local shared_data = ngx.shared.shared_data
shared_data:set("count", 1)

-- test.lua
count = count + 1
ngx.say("global variable : ", count)
local shared_data = ngx.shared.shared_data
ngx.say(", shared memory : ", shared_data:get("count"))
shared_data:incr("count", 1)
ngx.say("hello world")

-- 访问如http://192.168.1.2/lua 会发现全局变量一直不变,而共享内存一直递增
-- global variable : 2 , shared memory : 8 hello world
-- 另外注意一定在生产环境开启lua_code_cache,否则每个请求都会创建Lua VM实例。


-- 指令: init_worker_by_lua
--[[
    用于启动一些定时任务,比如心跳检查,定时拉取服务器配置等等;
    此处的任务是跟Worker进程数量有关系的,比如有2个Worker进程那么就会启动两个完全一样的定时任务。
    nginx.conf配置文件中的http部分添加如下代码:
    init_worker_by_lua_file /usr/example/lua/init_worker.lua;
    另外根据实际情况设置如下指令
    lua_max_pending_timers 1024;  #最大等待任务数
    lua_max_running_timers 256;   #最大同时运行任务数
]]

-- init_worker.lua
local count = 0
local delayInSeconds = 3
local heartbeatCheck = nil

heartbeatCheck = function(args)
    count = count + 1
    ngx.log(ngx.ERR, "do check ", count)
    local ok, err = ngx.timer.at(delayInSeconds, heartbeatCheck)
    if not ok then
        ngx.log(ngx.ERR, "failed to startup heartbeart worker...", err)
    end
end

heartbeatCheck()


-- 指令: set_by_lua
--[[
    设置nginx变量,我们用的set指令即使配合if指令也很难实现负责的赋值逻辑;
    语法set_by_lua_file $var lua_file arg1 arg2...;
    在lua代码中可以实现所有复杂的逻辑,但是要执行速度很快,不要阻塞;
    example.conf配置文件:
    location /lua_set_1 {
        default_type "text/html";
        set_by_lua_file $num /usr/example/lua/test_set_1.lua;
        echo $num;
    }
]]
-- test_set_1.lua
local uri_args = ngx.req.get_uri_args()
local i = uri_args["i"] or 0
local j = uri_args["j"] or 0
return i + j
-- 访问如http://192.168.1.2/lua_set_1?i=1&j=10进行测试。 如果我们用纯set指令是无法实现的。
etcd访问方式
https://github.com/etcd-io/etcd
如果想本地搭建的话,下载prebuild release版本的内容(https://github.com/etcd-io/etcd/releases),整个程序是用go编译的,如果机器没有go编译器就下载二进制,etcd默认启动在2379端口,启动方式就不多赘述了,官方github文档有解释。

apisix默认的配置中心为etcd,所以有必要对etcd进行一定的学习,方便后续调试debug时,排除etcd的问题;
现在的etcd都是v3.xxx的版本,这里只记录v3的api,至于v2的api这里就不记录了
https://doczhcn.gitbook.io/etcd/index/index/interacting_v3
这个链接是官方的中文文档,里面有详细的restful api的调用方式,以及etcdctl的客户端交互方式,用于设置、获取key以及集群的一系列操作,还包括了如何搭建etcd集群(运维相关),这里只简单摘取部分常用的方法,其他的参见文档:
有两种方式和etcd交互,一种是通过etcdctl,自带的etcd client,另一种是通过restful api访问;
etcdctl的安装方式(需要有go编译器,并且注意这里安装的是v3版本,如果要兼容使用v2的,需要修改环境变量export ETCDCTL_API=2)
go get go.etcd.io/etcd/client/v3
下面的命令都是基于v3版本的
查看etcd集群的成员
etcdctl --write-out=table --endpoints=localhost:12379 member list
会以表的形式输出成员信息
向一个etcd实例设置key(有raft协议保证数据在多个实例的一致性)
etcdctl --endpoint=your_etcd_addr put key value
获取key的值
etcdctl --endpoint=your_etcd_addr get key
获取范围的key
etcdctl --endpoint=your_etcd_addr get key key2
返回key到key2的所有kv
获取前缀为xxx的kv并限制输出数量
etcdctl --endpoint=your_etcd_addr get --prefix --limit=2 xxx
注意上面的--endpoints是一个全局设置,设置etcdctl要交互的etcd实例地址
查看etcdctl的版本
etcdctl version
查看etcdctl的帮助
etcdctl help 或 etcdctl -h
etcd对每一个kv的设置都会生成一个版本,每一次的put操作都会生成一个新版本revision,我们可以使用这个信息来回滚到某个版本的kv
如果想要访问某个版本的kv值(下面是获取版本4的key为foo的kv)
etcdl --endpoint your_etcd_addr get --prefix foo --rev=4
获取大于等于某个值的kv
etcdctl --endpoint your_etcd_addr get --from-key foo

删除某个key
etcdctl --endpoint your_etcd_addr del foo
范围删除(删除foo-foo9的kv),还可以搭配prefix、from-key组合使用
etcdctl --endpoint your_etcd_addr del foo foo9
监听key的变化,例如某个客户端修改了key的值,能够显示出来(也可以搭配prefix)
etcdctl --endpoint your_etcd_addr watch foo
etcdctl --endpoint your_etcd_addr watch foo foo9 范围watch
观察多个key
etcdctl watch -i
watch foo
watch zoo
可以搭配rev,查看历史版本以来的key的修改
etcdctl --endpoint your_etcd_addr watch --rev=2 foo(查看版本2以来,foo这个key的修改)
压缩版本,为了减少空间占用,etcd会压缩版本,如果版本被压缩了,那么上面的rev就不能使用这些版本号了,否则都是报找不到这个版本的错误:
Error: etcdserver: mvcc: required revision has been compacted
etcdctl --endpoint your_etcd_addr compact 5 (压缩前五个版本)
如果想查看当前etcd的版本号,可以使用下方的方法,无需使用一个存在的key,不存的key也可以正常访问:
etcdctl --endpoint your_etcd_addr get mykey -w=json
{"header":{"cluster_id":14841639068965178418,"member_id":10276657743932975437,"revision":15,"raft_term":4}}
我们可以给kv设置ttl,也即etcd所谓的租约,租约的ttl是全局的,要先设置ttl,然后再去给kv设置租约,这样新建的key的ttl就是我们刚刚设置的ttl;
因此我们可能多次修改全局ttl的大小,所以集群中所有的kv的租约都大于等于历史设置过的最小的ttl。
授予租约,TTL为10秒
$ etcdctl lease grant 10
lease 32695410dcc0ca06 granted with TTL(10s)
附加键 foo 到租约32695410dcc0ca06
$ etcdctl put --lease=32695410dcc0ca06 foo bar
OK
--lease后面的一串是租约的id,是我们随便指定的,但是不能重复,我们可以通过这个id来撤销租约,注意撤销租约的同时会把这个kv给删掉
etcdctl lease revoke 32695410dcc0ca06
如果想要维持租约,那么可以keep-alive ttl
$ etcdctl lease keep-alive 32695410dcc0ca06
lease 32695410dcc0ca06 keepalived with TTL(10)
lease 32695410dcc0ca06 keepalived with TTL(10)
lease 32695410dcc0ca06 keepalived with TTL(10)
...
我们也可以根据租约id来获取kv的租约信息
etcdctl lease timetolive 694d5765fc71500b
如果租约不存在,则会报错
etcd restful api访问
etcd v3使用grpc协议来进行通信,但是我们的curl使用的是http,因此etcd还提供了一个grpc-gateway来实现json到grpc的协议转换,提供restful的api,翻译http/json到grpc的消息。
https://app.swaggerhub.com/apis/390311010/etcd_restful_api/v3
上面是所有提供的接口信息,从官方openapi导入的,很详细了,但是可能缺少一些解释
下面的文档可以提供一定的帮助
https://doczhcn.gitbook.io/etcd/index/index/api_grpc_gateway
忽略文档中的v3alpha,自己使用的使用改成v3即可
# 创建 root 用户
curl -L http://localhost:2379/v3alpha/auth/user/add \
    -X POST -d '{"name": "root", "password": "pass"}'
# {"header":{"cluster_id":"14841639068965178418","member_id":"10276657743932975437","revision":"1","raft_term":"2"}}

# 创建 root 角色
curl -L http://localhost:2379/v3alpha/auth/role/add \
    -X POST -d '{"name": "root"}'
# {"header":{"cluster_id":"14841639068965178418","member_id":"10276657743932975437","revision":"1","raft_term":"2"}}

# 授予 root 角色
curl -L http://localhost:2379/v3alpha/auth/user/grant \
    -X POST -d '{"user": "root", "role": "root"}'
# {"header":{"cluster_id":"14841639068965178418","member_id":"10276657743932975437","revision":"1","raft_term":"2"}}

# 开启认证
curl -L http://localhost:2379/v3alpha/auth/enable -X POST -d '{}'
# {"header":{"cluster_id":"14841639068965178418","member_id":"10276657743932975437","revision":"1","raft_term":"2"}}
etcdctl 获取apisix的key
etcdctl --endpoint your_etcd_addr get --prefix /apisix
这是默认的,至于前缀是什么,由conf/config.yaml中的etcd项指定
key就是我们admin api用后缀路径
例如我们admin api获取一个路由的设置是
curl "http://apisix_host:9091/apisix/admin/routes/1" -XGET- H "X-API-KEY: xxxxx"
那么在etcd中的key就是
/apisix/routes/1
/apisix/services/9
以此类推
插件的ctx参数需要注意的事项

虽然官方文档写了是缓存了请求的相关信息,但是这部分信息中,有一部分是同一个路由下共用的,例如ctx.matched_route,如果两个请求同时修改了这个对象的数据,就会出现不可预知的情况。也即ctx这个table下的一些元素,是通过etcd拉取回来的,而在lua中,table是引用的,所以如果请求A改变了这个元素的值,请求B又要用到,那么就出现不可预期的错误。
apisix的worker最大可打开的文件数
因为apisix是基于nginx的,所以这里的配置都是nginx的配置

黑体标粗的第一行表示worker可以打开的文件数量,而第二行表示worker可以处理的最大连接数,因为连接需要通过socket打开fd来处理,所以第一行的大小是第二行配置的上限,例如nofile为1000,而connections为2000,那么最大也就只能并发1000个连接。
查看配置的连接数是否生效,首先ps -elf | grep worker查到pid,然后 cat /proc/pid/limits

当然这里配置的上限还受linux的全局配置影响,可以通过ulimit -a查看进程的最大打开文件数量限制

想要全局修改并一直生效的话,需要vim /etc/security/limits.conf进行修改
在该配置文件的最后加上:
-
soft nofile 65535
-
hard nofile 65535
注意*号是要写入配置文件的,表示对于所有用户的进程都适用,soft表示应用程序的上限,hard表示内核的上限。
如果只是想本次会话生效,那么ulimit -n 65535即可
